
- How to convert cassette tapes with Audacity
- Conclusion
- A Cassette Player Converter With A Built-In Speaker
- Copying an Audio CD to MP3
- Initial Settings for ASunder
- Start the Ripping
- Where are my MP3’s?
- Various Artists Problem
- Conclusion
- Which Should You Pick – Wired Or Bluetooth?
- Convenience
- Audio Quality
- Compatibility
- Personal Preference
- Solution 3: Convert Cassette Tape to MP3 with QuickTime Player and iTunes
- Step 1. Start & record
- Step 2. Convert M4A to MP3
- A Cassette Player Converter With Headphones
- MP3 Format and Cassette Tapes
- FAQs
- Best audio cassette adapter
- Description
- Description
- Types of Cassette Adapters
- Wired Cassette Adapters
- Bluetooth Cassette Adapters
- MP3 Cassette Adapters
- Appearance:
- How the best cassette to MP3 converters work
How to convert cassette tapes with Audacity
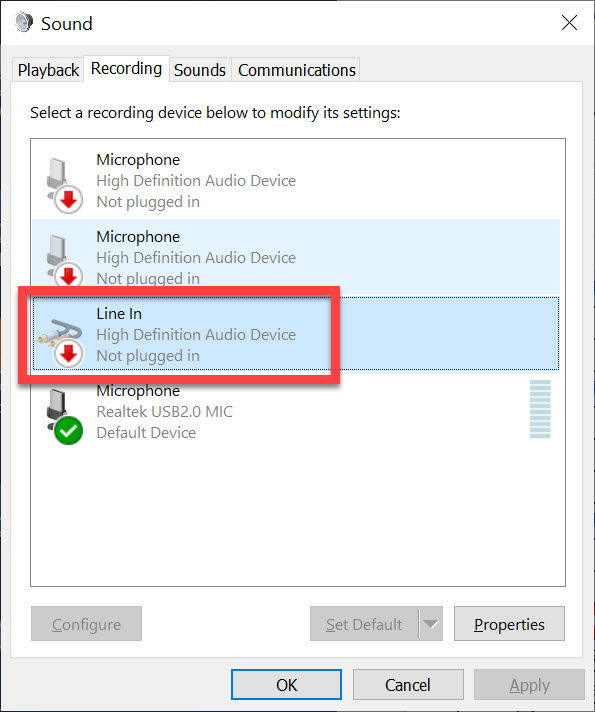
Attach the cassette player to your PC via USB or (as we are doing here) via the Line Input, then click Start and search for Control Panel.
Select it from the results that appear. Next, navigate to Hardware & Sound > Sound. This opens a new window in which you want to select the Recording tab and then ensure that you can see the Line In listed and that it says “Plugged in”. If you’re using a USB player, check that this is also in the list which it should be if you have Windows 10. If it isn’t there, it’s likely you’ll need to install the correct driver for it, and you’ll need to follow the manufacturer’s instructions to do so.
Launch Audacity, then from the menu bar at the top of the screen choose Edit > Preferences > Devices.

You’ll see a section in the main panel marked Interface. In here should be a drop-down menu with MME as an option. Select this.
Just below is another section entitled Recording. Be sure that the settings in the Channels field is 2 (Stereo) and that your player is the one chosen in the Device field.
With the settings in place you can now set the levels for recording. To do this, press play on the tape and then check that the two green bars in the upper right corner don’t go into the red, as that will distort the sound. To change the input levels you can either adjust the volume control on your player, or the input slider control (the one with a microphone icon) in Audacity.
Once you’re happy with the levels you can rewind your tape to the beginning, click record on Audacity and press play on the cassette once more.
When the tape reaches the end of side one, pause the recording, turn the cassette over, then resume.
After the contents have been recorded into Audacity you’ll be left with one, long continuous track. If you want to break this into individual tracks for each song then it will take a little editing.
Place the audacity playhead back at the beginning of the first track then select Tracks > Add Label At Selection from the menu bar at the top of the page.
Type in the name of the song, then press Enter. Now repeat this process, looking for the gaps between tracks that will be evident by the flat areas in the recording.

Now all you need to do is go to File > Export Multiple, select the format you desire, and finally click Export to send your sparking new digitised music to your hard drive. Note that Audacity doesn’t come with an MP3 encoder due to licensing, but will give you instructions on how to download and install the Lame MP3 Encoder.
If you have any old records or video-tapes that need transferring, then be sure to also read our
How to convert vinyl to mp3 and
How to convert VHS to digital guides.
Conclusion
Bluetooth cassette adapters have the power to instantly give you a modern audio experience in your vintage car. This not only lets you enjoy your favourite tunes in your car but also makes life easier for you.
Under this, there is always a question of whether the wired device is better or the Bluetooth one. To be honest, it completely depends on your personal preference. While Bluetooth adapters offer convenience and are more future-proof, wired ones deliver better audio quality and simplicity.
While heading out for your cassette adapter, make sure to consider some crucial factors as we mentioned above.
At last, being a tech-savvy person, I would just say that no matter whether you’re a guy who loves to play his latest tunes in his vintage car or you’re someone who wants to utilize the car’s cassette player, there is a cassette adapter that can suit you. So, look out for all the options available in the market and remember what we talked about here. I’m pretty sure that you’ll end up with a good cassette adapter.
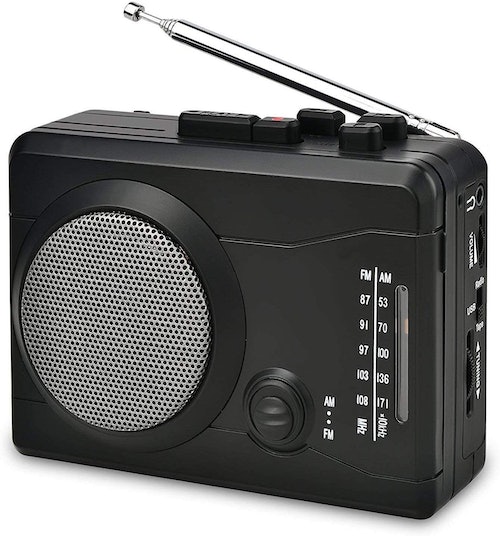
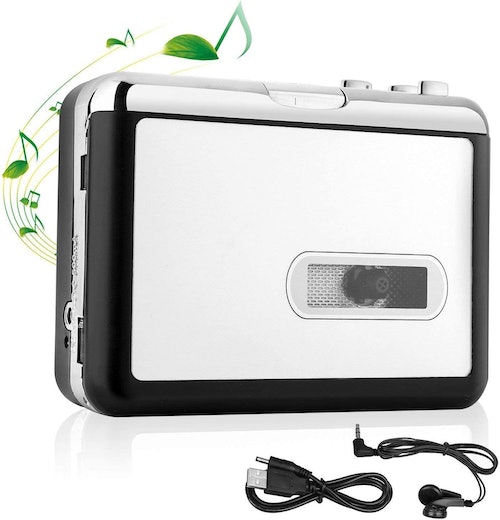
A Cassette Player Converter With A Built-In Speaker
Amazon
DIGITNOW USB Cassette Player
$37
See On Amazon
For a little more money, this cassette to digital converter has a built-in speaker and AM/FM radio, so you can listen to music — out loud — right there on the converter. Like the above option, this device has a USB port for thumb drives, but can also be connected to your computer with the included USB cable, so you can convert your tapes to MP3 format with a little help from audio capture software. A set of headphones is included for private listening on the converter, and there’s also a built-in microphone for one-touch voice recording. However, there is one thing to watch out for: the auto-reverse feature. It’s an upgrade that allows you to play the other side of the tape without flipping the cassette, but one reviewer noted there’s no overwrite protect sensor to prevent you from accidentally recording over your tape. This device is powered via USB cable or two AA batteries (sold separately).
According to a reviewer: “I bought this with some misgivings, but have been very pleasantly surprised by the quality of the sound it produces. I use it with Audacity 2.2.2 and Windows 7 and 10 and have had no problems. It appears to be sensitive to the proximity of a router or Wifi hub, but as long as these are kept at a distance, I find that the Audacity’s noise reduction facility reduces background hum to virtually zero.”
Copying an Audio CD to MP3
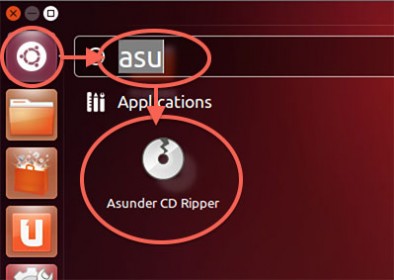
OK now that you have ASunder installed, let’s start it.
Under Ubuntu this is pretty easy, either by clicking the newly added icon on the left, or by opening “Dash Home” and start typing “asunder” and the application shortcut will appear. Click it to start ASunder.
Ubuntu – Start ASunder
ASunder running under Ubuntu
Initial Settings for ASunder
Before we start ripping our Audio CD collection, a few initial settings should be made. For this we click the “Preferences” button.
Go through the following tabs, and when finished with all tabs, click “OK“.
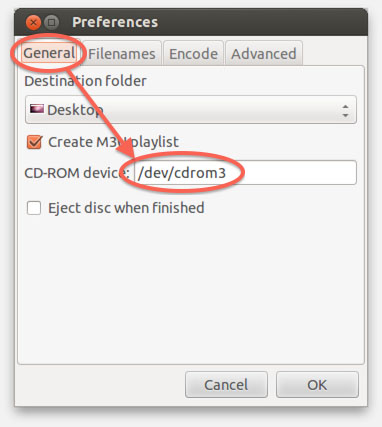
General tab
On the “General” tab you will have to set the proper CD-ROM drive.
By default under Ubuntu this is “/dev/cdrom“, but depending on your configuration this can be “/dev/cdrom1”, “/dev/cdrom2”, “/dev/cdrom3” etc.
Here we also set the destination folder or our freshly ripped MP3’s under “Destination folder“. ASunder will create a new folder in the selected destination with the album title as folder name, for the ripped MP3’s of that CD.
Optionally check the “Create MP3 Playlist” option, which will automatically create a playlist when done with ripping.
Asunder – Set the proper CD/DVD drive
Filenames tab
Under the “Filenames” tab, you con define the filenames of the MP3’s you’re going to create. It’s fully up to you what your preferences are, but I always use the format “<artist> – <song title>.mp3”. Adjust the names as you see fit.


Asunder – Filename formats
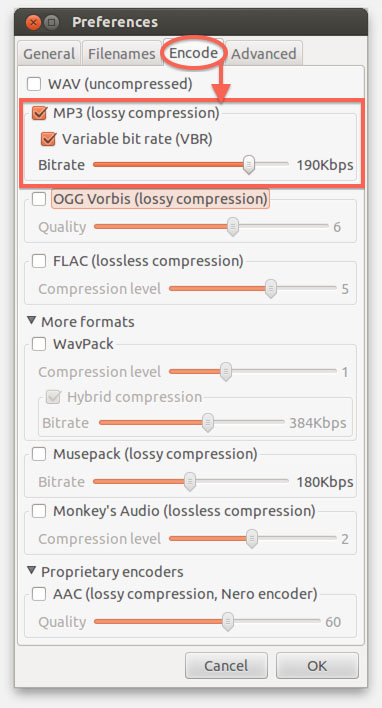
Encode tab
ASunder has a very wide selection of possible output formats, MP3 (through LAME) is just one of them.
In this tutorial we’re assuming you’d like to use MP3, so uncheck all options, and leave only “MP3 (lossy compression)” and “Variable bit rate (VBR)” checked and set the “Bitrate” slider in the MP3 group to “190Kbps“.
Naturally, it’s up to you what format and what bitrate you’d like to use. For higher quality move the slide for “Bitrate” further to the right. For smaller files move it more to the left. I would however recommend to not go below 130Kbps with MP3’s.
The other formats, like OGG, FLAC, etc., are not as widely supported by MP3 players as we’d like to see. AAC on the other hand is supported by most Apple and Android devices.
ASunder – What a great selection of file formats!
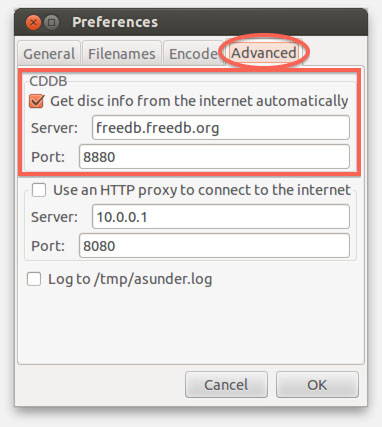
Advanced tab
Under this tab we can enable and configure meta data retrieval like CDDB and the use of a possible proxy. If you don’t know what a proxy is, or if you know you don’t need a proxy, then simply copy (if needed) the settings displayed below.
The should be the default settings, so it might be that you’re just verifying that the info is complete and correct.
ASunder – CDDB and Proxy settings
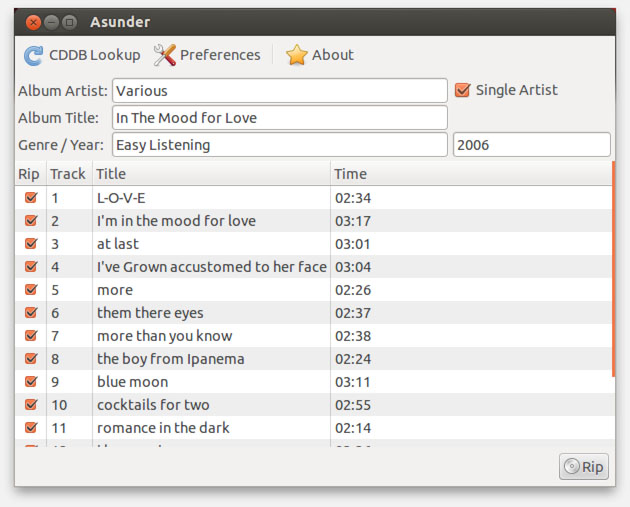
Start the Ripping
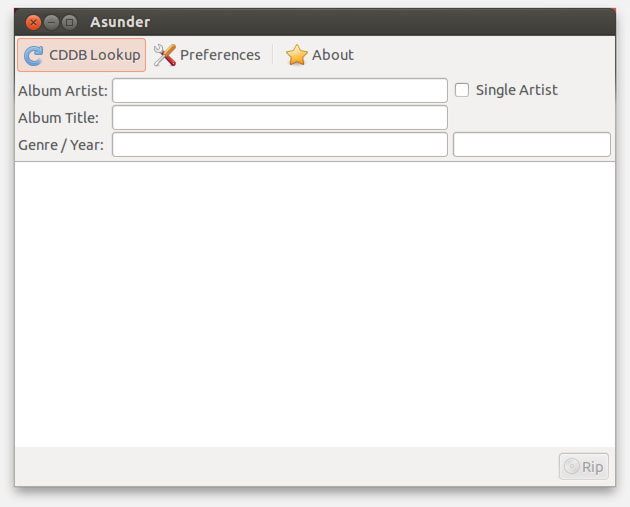
When done with all the settings (which should be a one-time deal), you’ll notice that the main screen changes if you have an Audio CD inserted. If not, insert an Audio CD now. If all names and titles are correct, click the “Rip” button.
If the screen remains blank, then you have either not inserted an Audio CD or you have set the wrong CD-ROM drive under the “General” tab.
If information is not complete, click “CDDB Lookup” to double check, but if it still doesn’t appear, you’ll have to enter the names manually – see below for an example on how to edit under “Various Artists Problem”.
Note : Homebrew Audio CD’s are rarely properly identified! This is normal, even in applications like iTunes, Windows Media Player, etc.
ASunder recognized my Audio CD
Asunder – Ripping MP3’s
Where are my MP3’s?
When Asunder is done with ripping your Audio CD to MP3’s, you’ll find a folder with the title of the album, created in the folder you previously selected as “Destination folder”.
In that folder you will find all ripped MP3’s and if you had “Create MP3 Playlist” checked under the “General” tab, then a playlist (circled in the illustration below) can be found here as well.
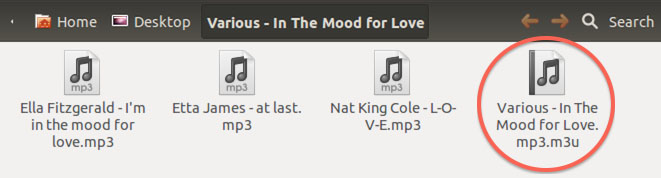
Your newly ripped MP3 songs and possibly a playlist
Various Artists Problem
One thing I did notice is that CDDB thinks my example Audio CD is done by a single artist. With “mix” Audio CD’s you might want to double check that. Note though that this is not a failure of ASunder, rather the problem with the provided data.
To fix this, uncheck “Single Artist“, and double click the artist name in the “Artist” column to enter the correct artist name.
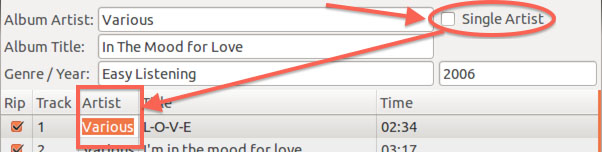
ASunder – Fix Various Artist problem

ASunder – Artists name corrected
Conclusion
If you’re an audiophile who does have a lot of personal audio tapes in your home collection — digitizing them via an MP3 conversion is definitely the way to go.
Making an investment into the best cassette to MP3 converter doesn’t require too much money — but it will ensure that any material that you’ve recorded stays safely preserved for a long time, in a much more dependable format.
We hope that our guide has helped you find the perfect converter for the job and that you have learned something new today. Make sure that you are staying safe in these times were are going through and have a good one, guys!
Which Should You Pick – Wired Or Bluetooth?
Choosing between a wired and a Bluetooth cassette adapter is a decision that hinges on a few key factors: convenience, audio quality, compatibility, and personal preference. Let’s break down these factors to help you make an informed choice.
Convenience
Hands down, the Bluetooth cassette adapters are your best bet when it comes to convenience. They completely erase your need for a physical wire, letting you play around with your device without bothering the cassette player. This is a great advantage for someone using this in a car. On top of this, these Bluetooth adapters also come with great features like hands-free calling and track control that make it even more convenient.
But wired adapters are different in this matter, as they need a direct connection between your adapter and your device. This means that you’ll have to deal with a wire running across your device and your cassette player all the time. This is a bit inconvenient and can cause a nuisance. That said, these are plug-and-play devices, meaning they need no pairing process or setup.
Audio Quality
Audio Quality is the most important factor in any music player, and both wired and Bluetooth adapters do a good job in this matter. Still, wired adapters have a significant edge over Bluetooth adapters, thanks to the plug-and-play feature that adds a direct connection between the device and the player.


On the contrary, Bluetooth adapters are generally prone to interference from other wireless devices as well. However, they do manage to give a decent sound to the listener.
All and all, sound quality is almost similar in both these types of adapters, and you can only find the difference between them if you are a true audiophile.
Compatibility
When it comes to compatibility, both the wired and Bluetooth adapters have a vast list of devices that they are compatible with. This is because almost all the devices come with Bluetooth connectivity and a headphone jack. But, if we consider the technological advancements, headphone jacks will soon become a thing of the past. So, this gives a plus point to the Bluetooth adapters.
Personal Preference
To be honest, choosing between a wired and a Bluetooth cassette adapter directly comes down to personal preference. So, if you like a clean, wire-free setup and don’t mind occasionally charging the adapter you’re carrying, a Bluetooth model might be the best one for you. On the flip side, if you value simplicity, reliability, and slightly better audio quality and don’t mind getting along with a wire, a wired adapter could be the way to go.
Solution 3: Convert Cassette Tape to MP3 with QuickTime Player and iTunes
If you are a Mac user, how to convert cassette tape to MP3 with built-in software? QuickTime Player will be your choice. More than just a video player, it’s an easily-available and well-supported choice for doing basic audio and video recording and editing. To begin with, you must make sure everything is ready.
Step 1. Start & record
Find and open QuickTime Player in your Applications folder, click “File,” then “New Screen Recording.” Do not forget to choose and audio input source below Microphone in the pop-up menu. After recording, get the output audio file in destination folder. However, the file is not in MP3 format but M4A.
Step 2. Convert M4A to MP3
The next step is to convert M4A format to MP3. Launch iTunes, select Preferences. Under General tab, click Import settings. Select Import Using to MP3 Encoder and press OK.
Press OK to save changes, and to close the General Preferences window. From your iTunes playlist, select the audio file that you want to convert to MP3. Once done, back on the iTunes main interface, right-click the M4A file, and choose Create MP3 Version from the displayed context menu to convert the file to MP3 format.
A Cassette Player Converter With Headphones
Amazon
OfficeLead Cassette Player
$26
See On Amazon
This easy-to-use and totally retro cassette to MP3 converter transfers recordings via the included USB cable that connects to your computer, where you can use audio capture software to digitize recordings. Plus, this handy gadget comes with a set of headphones, so you can listen to music directly on the converter. The device is powered with the USB cable or two AA batteries, which are sold separately.
According to a reviewer: “My wife has some old cassettes of her singing in her old band and wanted to get them in digital format for her before the tapes wore away or got lost. This is a very easy process and I love the fact that with a flash drive you don’t even need a PC. I used the auto tracking feature and it really works great.”
MP3 Format and Cassette Tapes
Now we’ll take a look at the two formats that you’ll be converting between using your cassette to MP3 converter. Now, you may be surprised to learn just how old the technology behind cassette tapes is.
In reality, the basics of this tech date back a hundred years ago — the first rudimentary cassette tapes that operated on magnetic principles were created in 1928.
Naturally, these were nothing like the portable and handy cassette tapes that we know from the 70s and onwards. The first ones were huge, cumbersome, and incredibly expensive — which is something every piece of technology goes through.
Naturally, the tapes needed to become more easily transportable before the general consumer public could use them. And once the compact cassettes that we all know and love were born — the stage was set for this audio format to take the world by storm.
Interestingly enough, these audio formats are the perfect example of how quickly technology has progressed. For instance, cassette tapes for the predominant audio format for an amazingly long amount of time — almost half a century. In comparison, the CD/DVD format which supplanted them didn’t last for more than a decade or two.
Still, if there’s something we find ubiquitous for the modern world of audio consumption — it’s the fact that MP3 is still the most widely used digital format for audio.
There are a couple of obvious reasons for this — storage is not an issue with the MP3 format because it doesn’t require more than a couple of megabytes for the average song.
And yet, it’s capable of retaining an excellent level of quality compared to bigger formats — making it the most convenient option in the digital realm.
Now that the Internet is pretty much a basic human utility, the sharing of MP3 files is more widespread than ever before — which is why you may want to think about converting your old cassette tapes and their content to this modern format.
And there are more reasons for this than pure convenience. Remember — as long as you have backups of your MP3 files to ensure that they’re not lost due to some sort of hardware failure; they can pretty much last you forever.
Conversely, even the best cassette tapes have a fairly limited shelf life. To be more precise — you shouldn’t expect cassette tapes to last you more than a decade or two.
And sure, that seems like a long time — but time goes by before you know it, and you’ll soon be faced with the fading and deteriorating of your cassette tape recordings. Not to mention the fact that your tapes could also be broken, lost, cracked, etc.
Once your cassette tape sustains enough damage, you will have no chance of recovering the audio content that you had there. Plus, ironically — the more you play a tape, the more worn out it will be.
So, the stuff that you like listening to the most is the stuff that has the biggest chances of being lost. Even if you don’t want to stop using your cassette tape player permanently — you may want to have a digital backup, in case something happens to the cassettes.
Indeed, these tapes can run into all manners of trouble that you simply can’t predict. As an example — if you recall the beginning of our guide, you’ll remember that cassette tapes work based on magnets.
And just like any other magnet-based tech; if you expose your cassette tapes to a powerful magnet accidentally, the entirety of your audio collection found on them will be irrevocably lost.
All of this can be easily solved with the best cassette to MP3 converter. If you use the physical audio recording that you have on the cassette and convert it to MP3 — the entire issue of misuse and shelf life completely goes away.
You can go a step further than keeping the MP3 backups on your computer — there are plenty of free cloud storage services where you can upload these. If you upload the recordings there, you’ve pretty much assured that you’ll have access to them forever; regardless of what happens to the hard copies found on the cassette tapes.
FAQs
Q: What is a Bluetooth cassette adapter?
A: A Bluetooth cassette adapter turns your cassette player into a wireless Bluetooth receiver, allowing you to stream music from your Bluetooth music player or your phone. It contains a long-lasting battery, which is rechargeable so that you can enjoy your long road trips.
Q: How does a Bluetooth cassette adapter work?
A: This product looks exactly like a regular cassette, but it has a Bluetooth receiver. Once you insert it in the car’s tape deck, it will automatically turn on and pick up the music streamed from your Bluetooth-enabled device such as a music player.
Q: Do cassette adapters sound good?
A: The sound quality you get from cassette adapters is pretty good. When you play the same track via the cassette adapter and an external CD, you could notice a little difference. Since FM transmitters are there, when you compare it to the wired connection, there has to be some signal loss.
Q: Why does my Bluetooth cassette adapter keep coming out?
A: Perhaps you have inserted your cassette player upside down. This can interfere with the adapter’s tension controllers that can be found inside it. When the radio doesn’t recognize the tension, it treats the tape as broken, so it ejects it. If you turn your cassette player over, it might solve your problem.


Q: What is the best Bluetooth cassette adapter?
A: The best Bluetooth cassette adapter for you depends on your needs. We have narrowed down the search for you, so you can easily find exactly what you’re looking for, you just need to read our list of 9 best Bluetooth cassette adapters in 2023.
Best audio cassette adapter
| Product | Features | Editor’s score | Go to site |
|---|---|---|---|
Description
Description
Get the most out of your classic car. With Cassette Adapter Bluetooth from ION, your vehicles cassette player becomes a wireless Bluetooth receiver.
Just like that, you can stream music from any Bluetooth music player or phone. No complicated installation. No cables. No tangled or snagged tape. Just pop it in and it automatically turns on.
The Cassette Adapter Bluetooth contains a long-lasting rechargeable battery for even the longest road trips. Plus, you now have a hands-free solution for phone calls. You can use your cars speakers to hear phone calls and music without having to buy a new stereo head-unit. Both of your hands stay safe on the wheel while your audio source stays in your pocket.
Cassette Adapter Bluetooth is the last cassette youll need and the first-and-only step to bring your favorite music, podcasts, and audiobooks into your car.
Cassette Adapter Bluetooth can only charge while it is removed from a cassette deck and not being used.
Types of Cassette Adapters
If you were thinking that there are only Bluetooth adapters in the market, you’re in for a surprise. Check out the various types of cassette adapters available right now.
Wired Cassette Adapters
The first one is the wired cassette adapters which are like the traditional cassette adapters. It is surely a classic device that was on the rise during the era of portable CD players. So, this device is very simple to use and has a no-frills solution that connects directly with your device through a headphone jack. On the other side, the second end of the adapter is a cassette tape that simply works in your cassette player.
After you’ve set it up, the music plays through your car’s speakers, just like a normal cassette tape would. The best part of this device is how simple and reliable it gets in daily use. On the contrary, the downside with these types of cassette adapters is that there is always a wire running from the cassette player to your phone, which is a little annoying at times.
Bluetooth Cassette Adapters
Next up, we have the Bluetooth cassette adapters. I’m sure you’re very well aware of this device, but if you’re not, it connects with your device through Bluetooth. This means that you can keep your phone at any place in your car or can even use it freely without the hassles of a wire. That said, you will realize a drop in the sound quality with this type of adapter as the music is coming through a wireless process.
MP3 Cassette Adapters
Finally, let’s talk about the legendary MP3 cassette adapters. These adapters come with built-in memory and are capable of storing music files. So, all you have to do is load your favorite songs in the adapter through a USB connection. After this, you can play any song available on the adapter directly without any hassles. This type of adapter is suitable for those who do not have much faith in external devices or for those long road trips where you’re expecting a hindrance in your phone’s network. However, with the world and tech evolving every day, it’s quite odd to use this type of adapter to this date, where you have to do so much just to play a song.
Still, I would say that there is not a particular adapter that is best or worst. It really depends on your needs and preference. So, if you want simplicity and reliability, you can go for a wired Bluetooth adapter. If you prefer the modern approach and want a hassle-free experience, a Bluetooth cassette adapter can be your best bet. And finally, if you’re looking for a standalone solution that does not depend on any external device, an MP3 cassette adapter could be your number one preference.
Appearance:
It looks pretty high scale for a cassette tape. Basically it is a black cassette tape, with a wire running from it. You simply plug this wire into the same port you would plug your ear buds in.
In the car, you now just power on your MP3 player, and wallah, your downloaded music will play through your car speakers.
It works pretty flawlessly, but definitely has a few kinks that need to be ironed out.
First and foremost, was one annoyance that occurs time to time with the iCarPay. While listening to music, the thing will spit out the cassette tape for now apparent reason, which is a pain, because you have to slip it back into the player in order for it to work.
Besides that one kink though, I was shocked at how simple the thing was to use. I thought transferring my MP3 music to play in my car would be an expensive and annoying process, but this simple little adapter gave me exactly what I was looking for, with barely any troubles at all.
How the best cassette to MP3 converters work
Most of the products we reviewed come in the form of a small handheld cassette player with a USB port that connects to your computer. These devices are usually coupled with a software component that you need to install on your system.
Once you have the cassette you want to convert in the deck and connected to your computer, all you need to do is press Play on your deck and Record in the software and it will capture the audio as it plays back. After the converter software has captured the audio, you can export it as an MP3. Then you can do pretty much anything with it. You can burn it to a CD, sync it to any of the best smartphones, upload it to the internet, or import it into an audio editing application for further work.
Converting the audio found on cassette tapes can be a time-consuming process. That’s because it’s not a simple file transfer that only takes a few seconds. Cassette to MP3 converters must record the audio in real time as it plays in the deck. If you’re converting a whole cassette, this can take up to an hour. Then you have to go into the application to listen to the captured content, edit the audio, separate the tracks and a few other things. These are all pretty simple things to master, but it can be quite involved as well. Just know that if you’re converting a lot of tapes, you’re probably looking at a long-term project.


